nginx的作用是让后端多个服务器来同时分担用户的流量,从而减少单个服务器的压力。在自动化持续交付的时候,我们不能采用手工得方式来进行灰度发布,即在nginx服务器上关闭发布服务器,平滑重启nginx。这时引用了consul,通过consul来动态的管理nginx后端服务器,不需要平滑重启nginx也能在nginx上关闭后端服务器。
安装依赖
yum -y install gcc gcc-c++ make libtool zlib zlib-devel openssl openssl-devel pcre pcre-devel
下载文件
cd /opt/software
wget https://releases.hashicorp.com/consul/0.7.1/consul_0.7.1_linux_amd64.zip
wget http://nginx.org/download/nginx-1.11.5.tar.gz
wget https://github.com/weibocom/nginx-upsync-module/archive/master.zip

unzip consul_0.7.1_linux_amd64.zip
unzip master.zip
tar zxf nginx-1.11.5.tar.gz
配置nginx
groupadd nginx
useradd -g nginx -s /sbin/nologin nginx
mkdir -p /var/tmp/nginx/client/
mkdir -p /usr/local/nginx
编译安装nginx
./configure   --prefix=/usr/local/nginx   --user=nginx   --group=nginx   --with-http_ssl_module   --with-http_flv_module   --with-http_stub_status_module   --with-http_gzip_static_module   --with-http_realip_module   --http-client-body-temp-path=/var/tmp/nginx/client/   --http-proxy-temp-path=/var/tmp/nginx/proxy/   --http-fastcgi-temp-path=/var/tmp/nginx/fcgi/   --http-uwsgi-temp-path=/var/tmp/nginx/uwsgi   --http-scgi-temp-path=/var/tmp/nginx/scgi   --with-pcre --add-module=../nginx-upsync-module-master
make && make install
nginx配置文件
# /usr/local/nginx/conf/nginx.conf
#user  nobody;
worker_processes  1;

#error_log  logs/error.log;
#error_log  logs/error.log  notice;
#error_log  logs/error.log  info;

#pid        logs/nginx.pid;


events {
    worker_connections  1024;
}


http {
    include       mime.types;
    default_type  application/octet-stream;

    log_format  main  '$remote_addr - $remote_user [$time_local] "$request" '
                      '$status $body_bytes_sent "$http_referer" '
                      '"$http_user_agent" "$http_x_forwarded_for"'
 		      '$upstream_addr $upstream_status $upstream_response_time $request_time';

    access_log  logs/access.log  main;

    sendfile        on;
    #tcp_nopush     on;

    #keepalive_timeout  0;
    keepalive_timeout  65;

    #gzip  on;
    #
    vhost_traffic_status_zone;
    #proxy_cache_path /tmp/cache_backend keys_zone=cache_backend:10m;

    upstream test {
        server 127.0.0.1:11111;
        upsync 192.168.77.129:8500/v1/kv/upstreams/test upsync_timeout=6m upsync_interval=500ms upsync_type=consul strong_dependency=off;
        upsync_dump_path /usr/local/nginx/conf/servers/servers_test.conf;
        server 192.168.77.140:8080 backup;
    }

    upstream bar {
        server 192.168.77.139:80 weight=1 fail_timeout=10 max_fails=3;
    }


    server {
        listen 80;

        location = / {
        proxy_pass http://test;
	      proxy_set_header  Host  $host;
	      proxy_set_header  X-Real-IP  $remote_addr;
	      proxy_set_header  X-Forwarded-For  $proxy_add_x_forwarded_for;
	      add_header	real $upstream_addr;
        }

        location ~ /Content|Scripts/ {
	      proxy_pass http://test;
	      proxy_set_header  Host  $host;
	      proxy_set_header  X-Real-IP  $remote_addr;
	      proxy_set_header  X-Forwarded-For  $proxy_add_x_forwarded_for;
        }

        location = /bar {
            proxy_pass http://bar;
        }

        location = /upstream_show {
            upstream_show;
        }

        location = /upstream_status {
            stub_status on;
            access_log off;
        }
    }
}
创建upsync_dump_path
mkdir /usr/local/nginx/conf/servers/
安装consul
mkdir /usr/local/consul
mv consul /usr/local/consul/
启动consul
/usr/local/consul/consul agent -server -bootstrap-expect=1 -data-dir=/consul_data -node=one1 -bind=192.168.77.129 -config-dir=/etc/consul.d -client 0.0.0.0 -ui
添加后端服务
curl -X PUT http://192.168.77.129:8500/v1/kv/upstreams/test/192.168.77.140:80
curl -X PUT http://192.168.77.129:8500/v1/kv/upstreams/test/192.168.77.142:80
关闭后端服务
curl -X PUT -d '{"weight":2, "max_fails":2, "fail_timeout":10, "down":0}' http://192.168.77.129:8500/v1/kv/upstreams/test/192.168.77.140:80
开启后端服务
curl -X PUT -d '{"weight":2, "max_fails":2, "fail_timeout":10, "down":0}' http://192.168.77.129:8500/v1/kv/upstreams/test/192.168.77.142:80
启动nginx
nginx
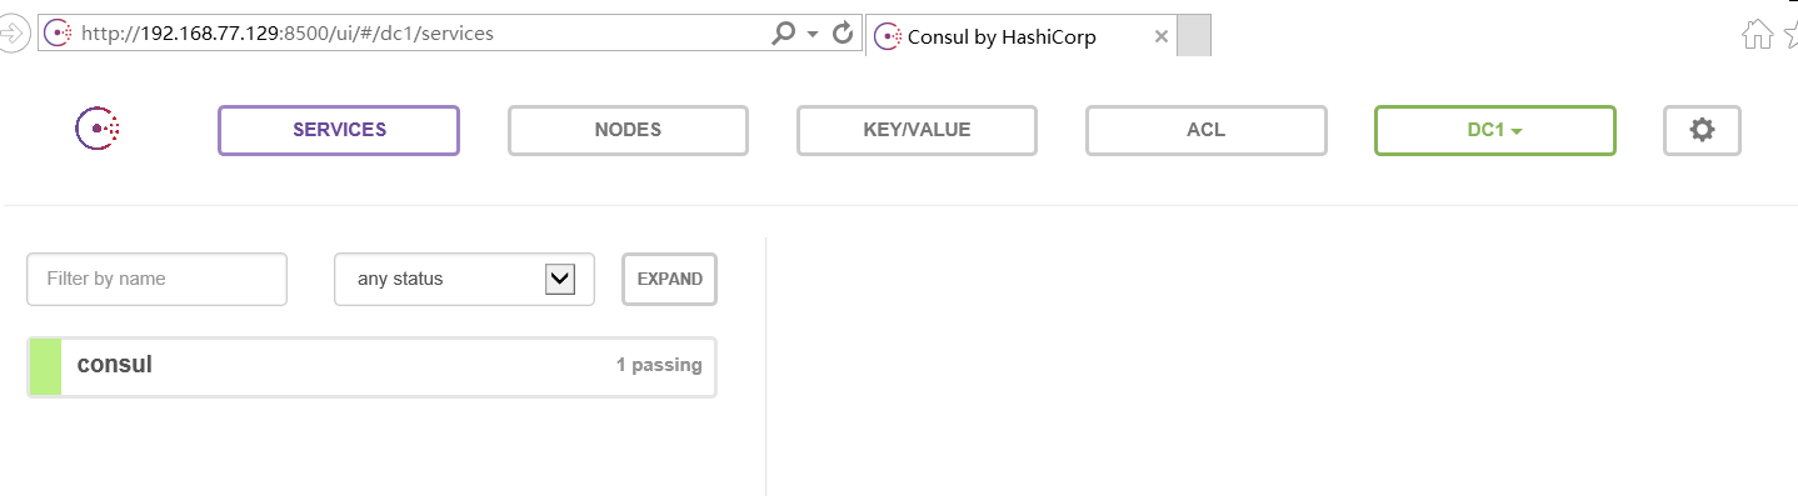
查看consul web信息
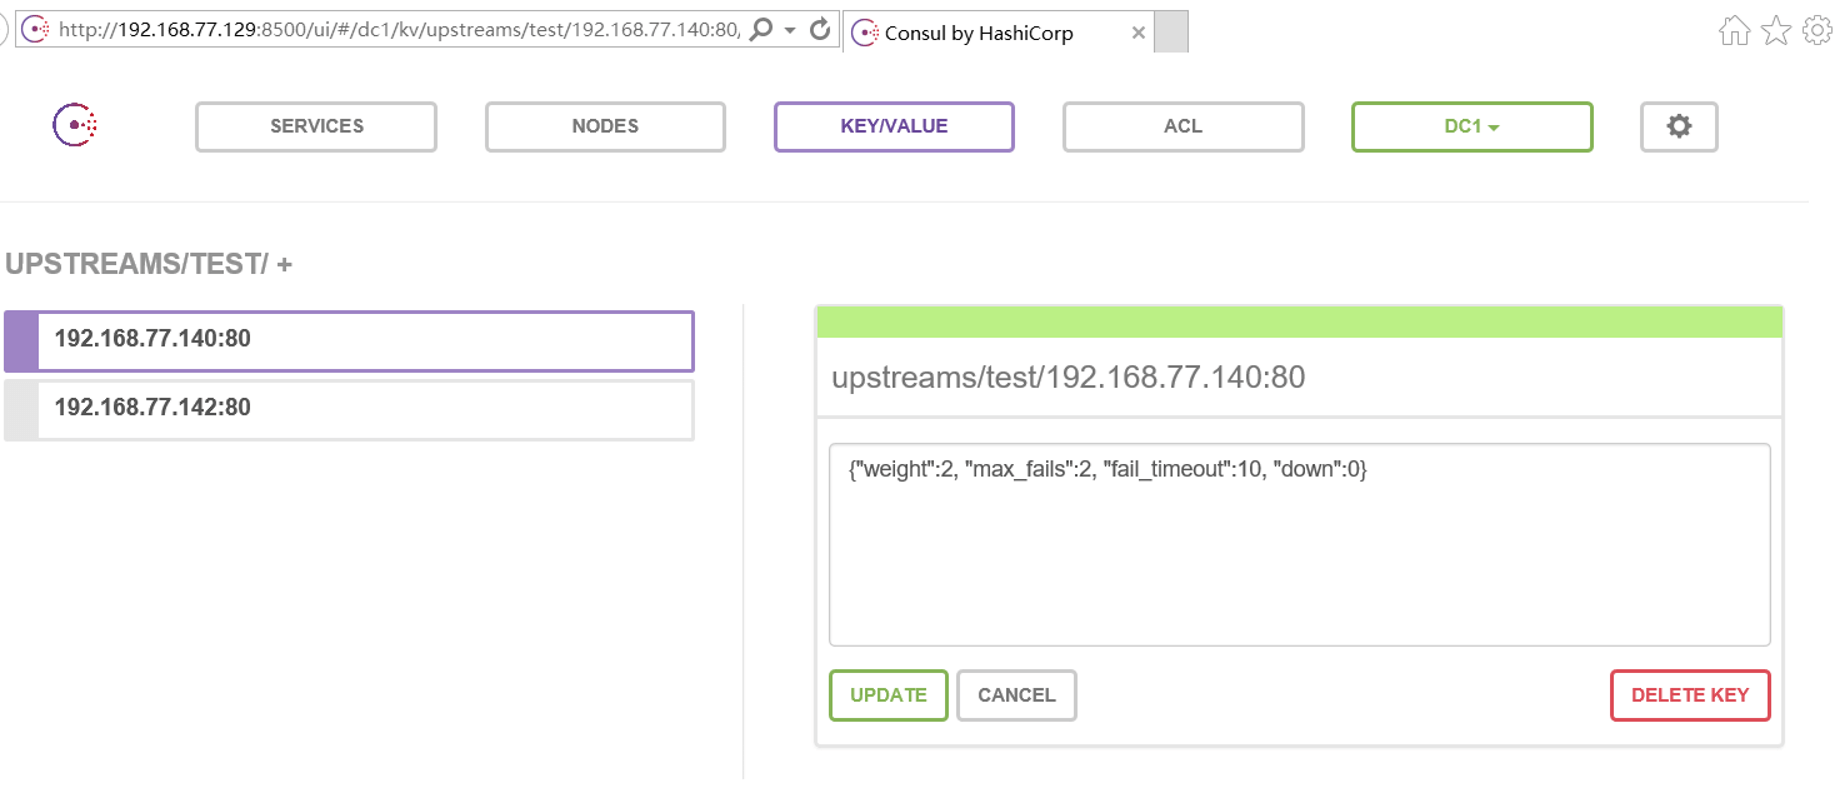
查看通过consul添加的后端服务
cat /usr/local/nginx/conf/servers/servers_test.conf
server 192.168.77.142:80 weight=2 max_fails=2 fail_timeout=10s;
server 192.168.77.140:80 weight=2 max_fails=2 fail_timeout=10s;
访问nginx,测试下是否代理到后端服务

real地址就是后端服务器的地址。