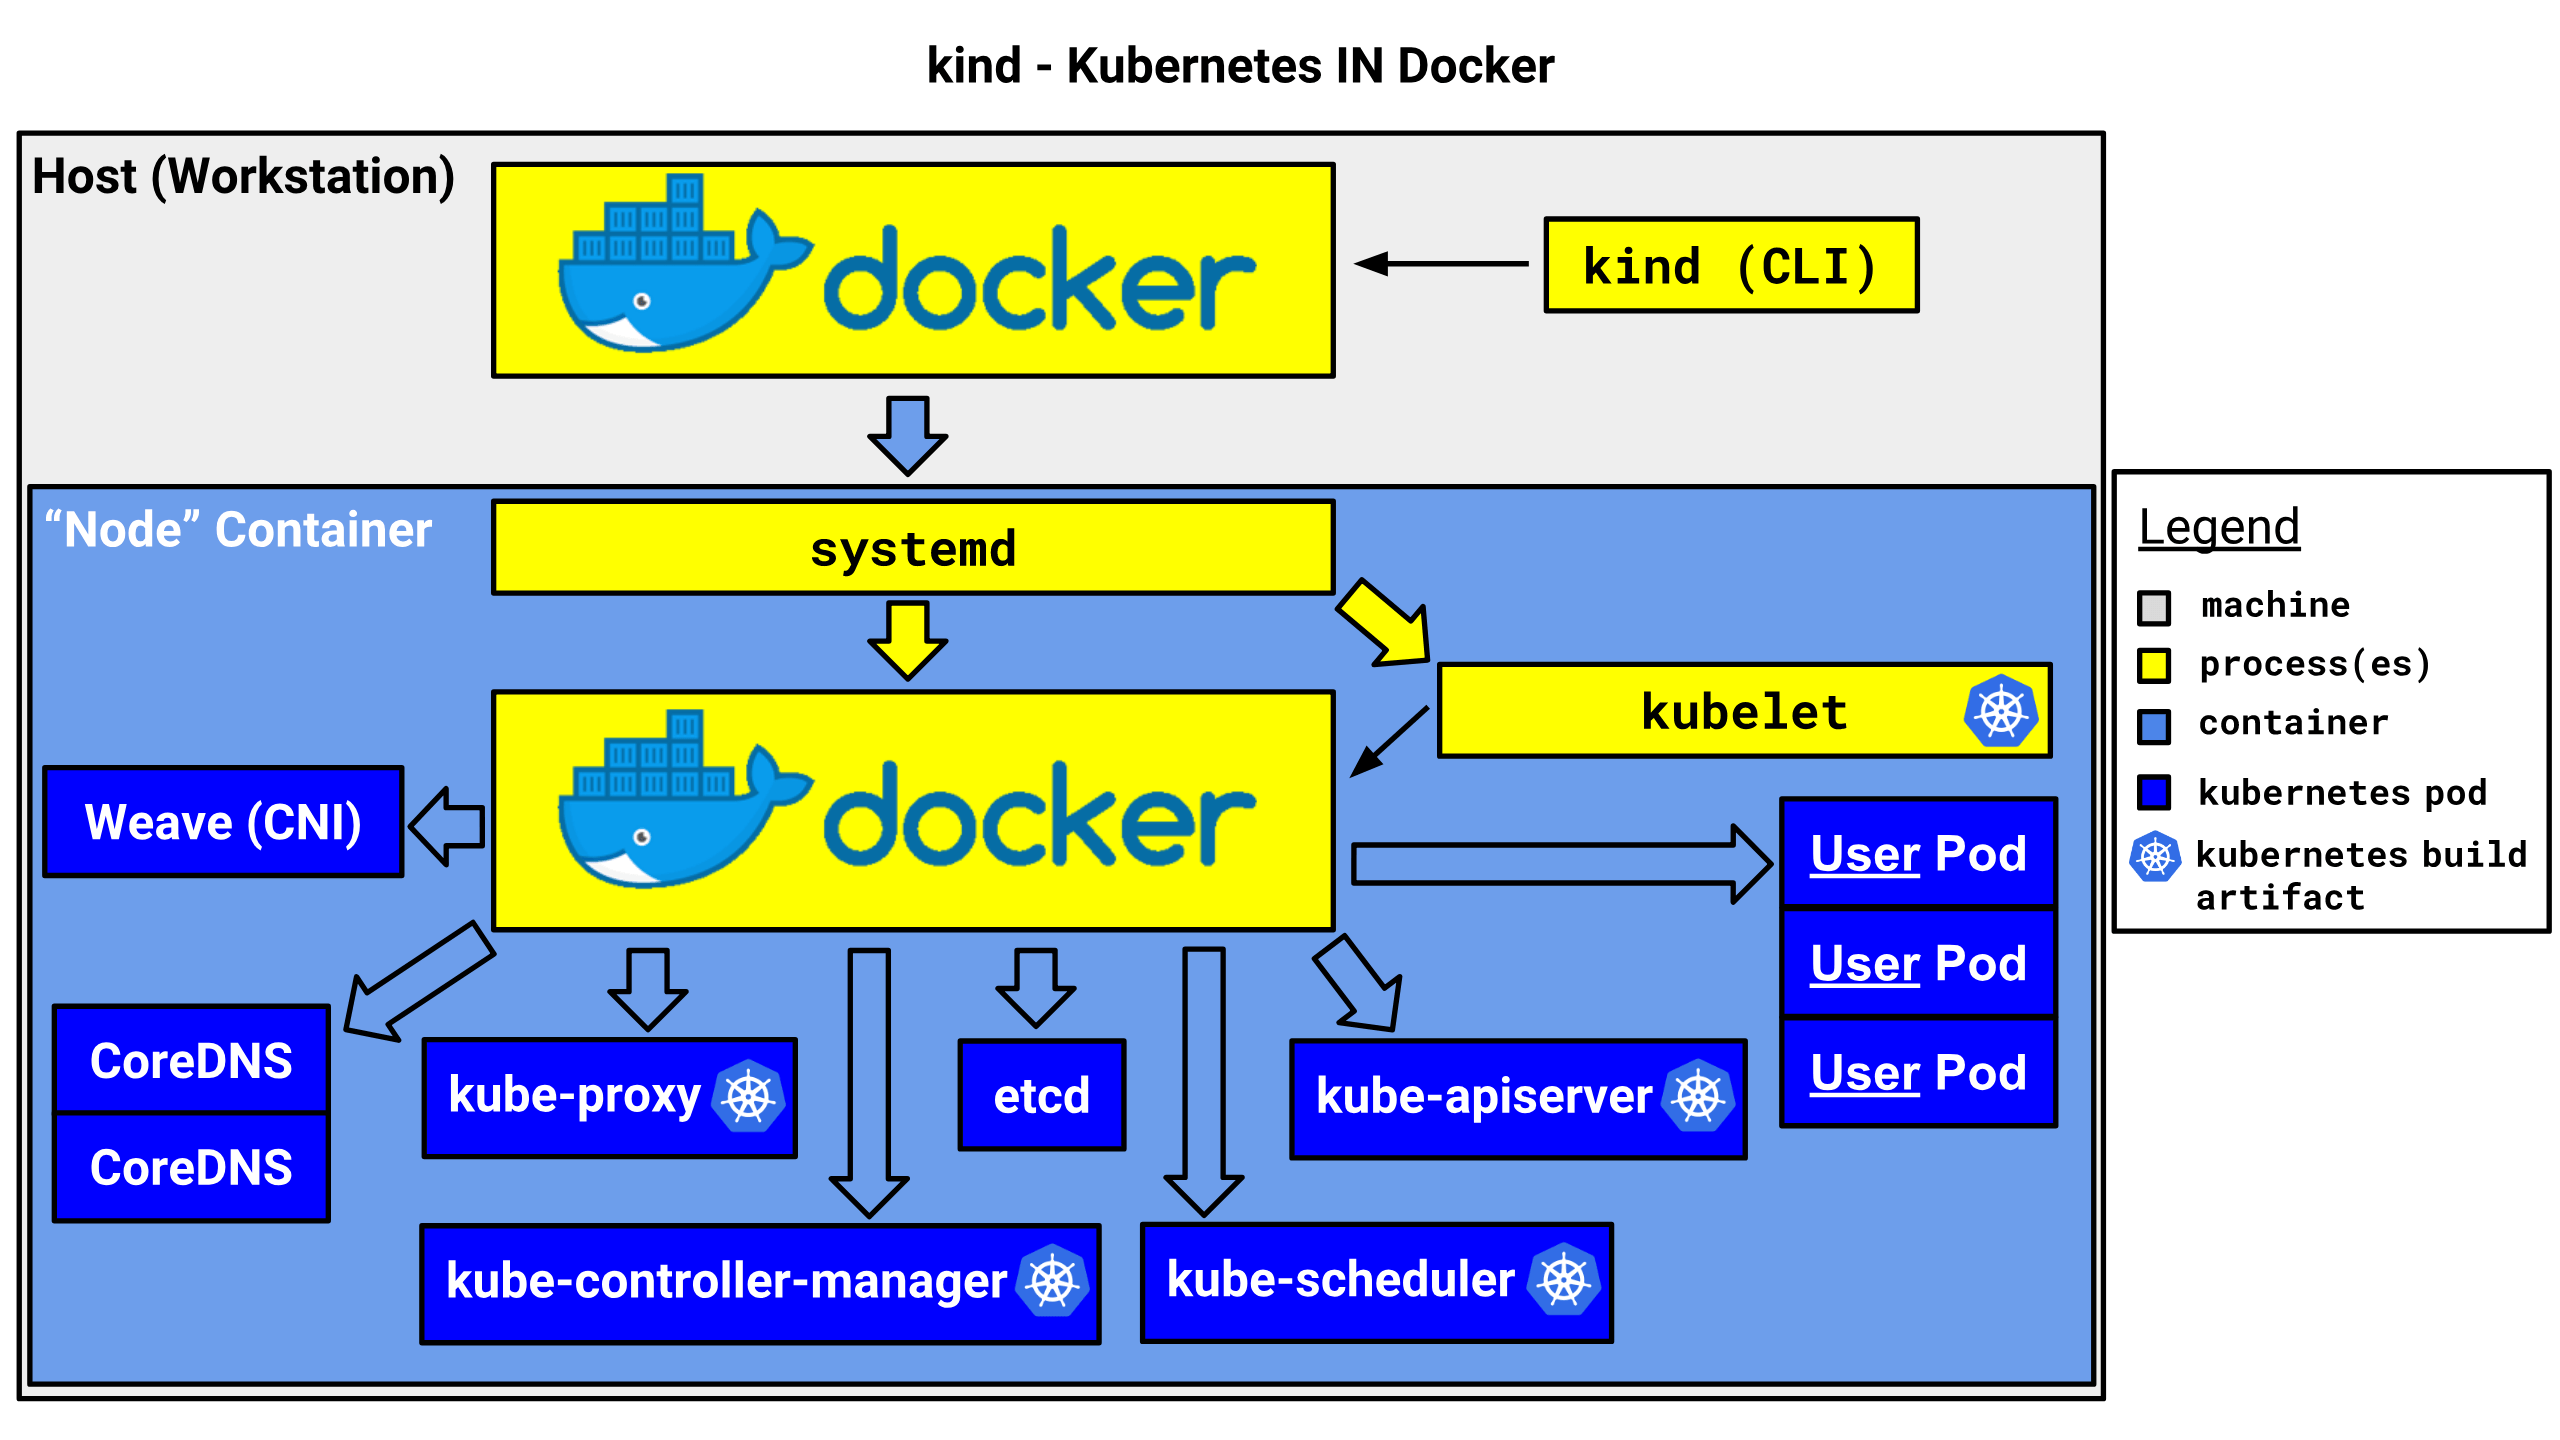
Kind 介绍
Kind是Kubernetes In Docker的缩写,顾名思义是使用Docker容器作为Node并将Kubernetes部署至其中的一个工具。官方文档中也把Kind作为一种本地集群搭建的工具进行推荐。默认情况下,Kind会先下载kindest/node镜像,该镜像包含kubernetes的主要组件,当镜像节点准备好时,Kind使用kubeadm进行集群的创建,内部使用containerd跑组件容器。最终,Kind只是为了方便测试kubernetes集群的,且不可用于生产环境。
安装Kind
Kind使用Golang进行开发,在仓库的Release页面,已经上传了构建好的二进制,支持多种操作系统,可直接按需下载进行使用。
wget -O /usr/local/bin/kind https://github.com/kubernetes-sigs/kind/releases/download/v0.4.0/kind-linux-amd64 && chmod +x /usr/local/bin/kind
安装docker
yum-config-manager --add-repo https://mirrors.ustc.edu.cn/docker-ce/linux/centos/docker-ce.repo
sed -i 's#download.docker.com#mirrors.ustc.edu.cn/docker-ce#g' /etc/yum.repos.d/docker-ce.repo
yum install -y docker-ce
部署kubectl
wget -O /usr/local/bin/kubctl https://storage.googleapis.com/kubernetes-release/release/v1.14.2/bin/linux/amd64/kubectl
chmod +x /usr/local/bin/kubectl
创建单集群
使用kind create 创建集群,默认是单节点集群。
# kind create cluster --name test
Creating cluster "test" ...
 ✓ Ensuring node image (kindest/node:v1.15.0)
 ✓ Preparing nodes
 ✓ Creating kubeadm config
 ✓ Starting control-plane ️
 ✓ Installing CNI
 ✓ Installing StorageClass

Cluster creation complete. You can now use the cluster with:

export KUBECONFIG="$(kind get kubeconfig-path --name="test")"
kubectl cluster-info
在docker环境下,会启动一个镜像
CONTAINER ID        IMAGE                              COMMAND                  CREATED             STATUS              PORTS                                                                      NAMES
2e0a5e15a4a0        kindest/node:v1.15.0               "/usr/local/bin/entr…"   14 minutes ago      Up 14 minutes       45319/tcp, 127.0.0.1:45319->6443/tcp    test-control-plane
查看集群信息
export KUBECONFIG="$(kind get kubeconfig-path --name="test")"
echo 'export KUBECONFIG="$(kind get kubeconfig-path --name=test)"' >> /root/.bashrc


kubectl cluster-info
Kubernetes master is running at https://localhost:45319
KubeDNS is running at https://localhost:45319/api/v1/namespaces/kube-system/services/kube-dns:dns/proxy

To further debug and diagnose cluster problems, use 'kubectl cluster-info dump'.

kubectl get node -o wide
NAME                 STATUS   ROLES    AGE   VERSION   INTERNAL-IP   EXTERNAL-IP   OS-IMAGE                                  KERNEL-VERSION          CONTAINER-RUNTIME
test-control-plane   Ready    master   16m   v1.15.0   172.17.0.2    <none>        Ubuntu Disco Dingo (development branch)   3.10.0-693.el7.x86_64   containerd://1.2.6-0ubuntu1

kubectl get pods --all-namespaces
NAMESPACE     NAME                                         READY   STATUS    RESTARTS   AGE
kube-system   coredns-fb8b8dccf-6r58d                      1/1     Running   0          17m
kube-system   coredns-fb8b8dccf-bntk8                      1/1     Running   0          17m
kube-system   etcd-test-control-plane                      1/1     Running   0          17m
kube-system   ip-masq-agent-qww8n                          1/1     Running   0          17m
kube-system   kindnet-vbz6w                                1/1     Running   0          17m
kube-system   kube-apiserver-test-control-plane            1/1     Running   0          16m
kube-system   kube-controller-manager-test-control-plane   1/1     Running   0          17m
kube-system   kube-proxy-wf7dq                             1/1     Running   0          17m
kube-system   kube-scheduler-test-control-plane            1/1     Running   0          16m
启动nginx app
kubectl run nginx --image nginx:1.17.0-alpine --restart=Never --port 80 --labels="app=nginx-test"
指定配置文件创建
# cat kube-config.yaml
kind: Cluster
apiVersion: kind.sigs.k8s.io/v1alpha3
kubeadmConfigPatches:
- |
  apiVersion: kubeadm.k8s.io/v1beta2
  kind: ClusterConfiguration
  metadata:
    name: config
  networking:
    serviceSubnet: 10.0.0.0/16
  imageRepository: registry.aliyuncs.com/google_containers
  nodeRegistration:
    kubeletExtraArgs:
      pod-infra-container-image: registry.aliyuncs.com/google_containers/pause:3.1
- |
  apiVersion: kubeadm.k8s.io/v1beta2
  kind: InitConfiguration
  metadata:
    name: config
  networking:
    serviceSubnet: 10.0.0.0/16
  imageRepository: registry.aliyuncs.com/google_containers
nodes:
- role: control-plane

# kind create cluster --name test2 --config kube-config.yaml
Creating cluster "test2" ...
 ✓ Ensuring node image (kindest/node:v1.15.0)
 ✓ Preparing nodes
 ✓ Creating kubeadm config
 ✓ Starting control-plane ️
 ✓ Installing CNI
 ✓ Installing StorageClass
                            Cluster creation complete. You can now use the cluster with:

export KUBECONFIG="$(kind get kubeconfig-path --name="test2")"
kubectl cluster-info
创建ha集群
只能通过配置文件来声明ha集群配置
# cat kind-ha-config.yaml
kind: Cluster
apiVersion: kind.sigs.k8s.io/v1alpha3
kubeadmConfigPatches:
- |
  apiVersion: kubeadm.k8s.io/v1beta2
  kind: ClusterConfiguration
  metadata:
    name: config
  networking:
    serviceSubnet: 10.0.0.0/16
  imageRepository: registry.aliyuncs.com/google_containers
  nodeRegistration:
    kubeletExtraArgs:
      pod-infra-container-image: registry.aliyuncs.com/google_containers/pause:3.1
- |
  apiVersion: kubeadm.k8s.io/v1beta2
  kind: InitConfiguration
  metadata:
    name: config
  networking:
    serviceSubnet: 10.0.0.0/16
  imageRepository: registry.aliyuncs.com/google_containers
nodes:
- role: control-plane
- role: control-plane
- role: control-plane
- role: worker
- role: worker
- role: worker

# kind create cluster --name test-ha --config kind-ha-config.yaml
Creating cluster "test-ha" ...
 ✓ Ensuring node image (kindest/node:v1.15.0)
 ✓ Preparing nodes
 ✓ Configuring the external load balancer ⚖️
 ✓ Creating kubeadm config
 ✓ Starting control-plane ️
 ✓ Installing CNI
 ✓ Installing StorageClass
 ✓ Joining more control-plane nodes
 ✓ Joining worker nodes

                         Cluster creation complete. You can now use the cluster with:

export KUBECONFIG="$(kind get kubeconfig-path --name="test3")"
kubectl cluster-info


# kubectl get nodes
NAME                   STATUS   ROLES    AGE     VERSION
test3-control-plane    Ready    master   7m44s   v1.15.0
test3-control-plane2   Ready    master   4m59s   v1.15.0
test3-control-plane3   Ready    master   2m18s   v1.15.0
test3-worker           Ready    <none>   110s    v1.15.0
test3-worker2          Ready    <none>   109s    v1.15.0
test3-worker3          Ready    <none>   105s    v1.15.0
常用操作
获取集群的配置文件夹路径
kind get kubeconfig-path --name="test"
删除集群
kind delete cluster --name test
挂载文件
nodes:
- role: control-plane
  extraMounts:
    - containerPath: /etc/docker/daemon.json
      hostPath: /etc/docker/daemon.json
      readOnly: true
暴露端口
nodes:
- role: control-plane
  extraPortMappings:
    - containerPort: 30080
      hostPort: 30080
有时候我们想暴露svc的端口给外部访问,因为kubernetes的节点是在docker容器中,所以还需要容器暴露svc的端口,外部才能通过宿主机访问。
从私有仓库下载镜像
docker exec test-drone-control-plane bash -c "sed -i '56a\        [plugins.cri.registry.mirrors.\"192.168.77.134:5000\"]' /etc/containerd/config.toml"
docker exec test-drone-control-plane bash -c "sed -i '57a\          endpoint = [\"http://192.168.77.134:5000\"]' /etc/containerd/config.toml"
docker exec test-drone-control-plane bash -c "cat /etc/containerd/config.toml"
docker exec test-drone-control-plane bash -c 'kill -s SIGHUP $(pgrep containerd)'
还可以通过挂载文件的方式,挂载containerd的配置文件
重启集群
docker stop test-drone-control-plane
docker start test-drone-control-plane
总之,kind可以很方便的在docker环境下创建测试集群,而不污染我们的宿主机,给我们测试提供了很大的便利。