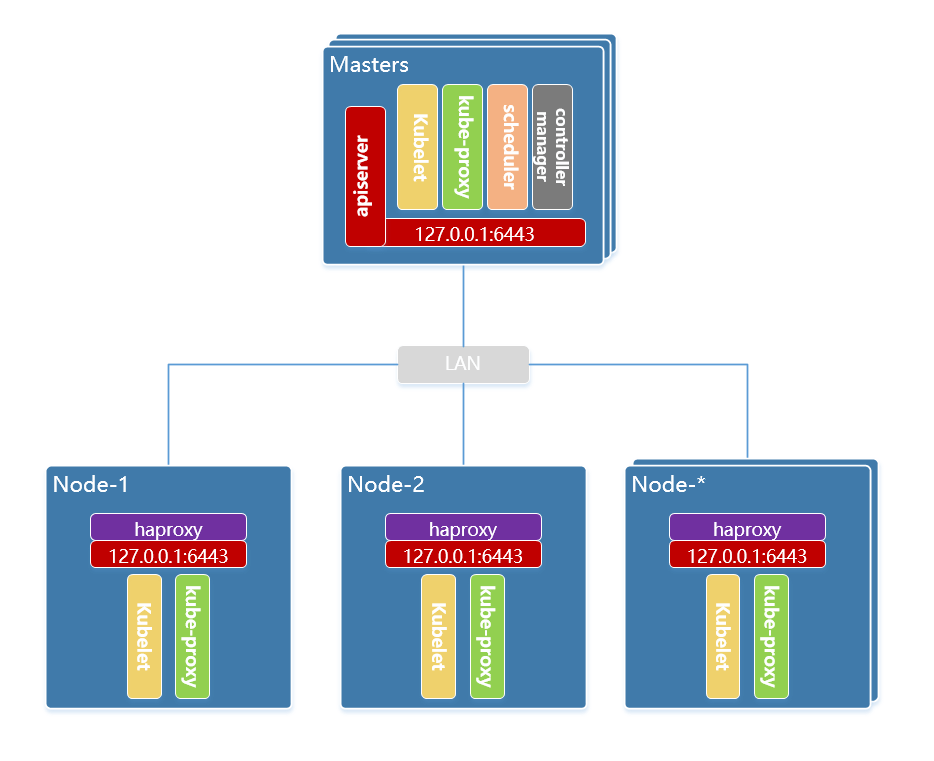
本次使用全手工的方式以kubeadm形式部署kubernetes的ha集群,ha方式选择node节点代理apiserver的方式。
环境信息
| System OS | IP Address | Docker | Kernel | Hostname | Cpu | Memory | Role |
|---|---|---|---|---|---|---|---|
| CentOS 7.4.1708 | 192.168.77.130 | 19.03.2 | 5.1.11-1.el7 | k8s-m1 | 2C | 4G | k8s-master |
| CentOS 7.4.1708 | 192.168.77.131 | 19.03.2 | 5.1.11-1.el7 | k8s-m2 | 2C | 4G | k8s-master |
| CentOS 7.4.1708 | 192.168.77.132 | 19.03.2 | 5.1.11-1.el7 | k8s-m3 | 2C | 4G | k8s-master |
| CentOS 7.4.1708 | 192.168.77.133 | 19.03.2 | 5.1.11-1.el7 | k8s-n1 | 2C | 4G | k8s-node |
| CentOS 7.4.1708 | 192.168.77.134 | 19.03.2 | 5.1.11-1.el7 | k8s-n2 | 2C | 4G | k8s-node |
版本信息
kubeadm: v1.15.4
Kubernetes: v1.15.4
CNI: v0.7.5
etcd: v3.2.18
Docker CE: 19.03.2
Calico: v3.8
网络信息
- Cluster IP CIDR:
10.244.0.0/16 - Service Cluster IP CIDR:
10.96.0.0/12 - Service DNS IP:
10.96.0.10 - DNS DN:
cluster.local - Kubernetes API:
apiserver.k8s.local:6443
apiserver.k8s.local 需要绑定host解析的,ip指向k8s master的api server
初始化所有节点
YUM源调整
sed -e 's!^#baseurl=!baseurl=!g' \
       -e  's!^mirrorlist=!#mirrorlist=!g' \
       -e 's!mirror.centos.org!mirrors.ustc.edu.cn!g' \
       -i  /etc/yum.repos.d/CentOS-Base.repo

yum install -y epel-release
sed -e 's!^mirrorlist=!#mirrorlist=!g' \
	-e 's!^#baseurl=!baseurl=!g' \
	-e 's!^metalink!#metalink!g' \
	-e 's!//download\.fedoraproject\.org/pub!//mirrors.ustc.edu.cn!g' \
	-e 's!http://mirrors\.ustc!https://mirrors.ustc!g' \
	-i /etc/yum.repos.d/epel.repo /etc/yum.repos.d/epel-testing.repo
关闭防火墙
systemctl stop firewalld && systemctl disable firewalld
关掉网络服务
systemctl stop NetworkManager && systemctl disable NetworkManager
关闭selinux
setenforce 0
sed -i "s#=enforcing#=disabled#g" /etc/selinux/config
关闭swap
swapoff -a && sysctl -w vm.swappiness=0
sed -ri '/^[^#]*swap/s@^@#@' /etc/fstab
同步时间
yum install -y ntpdate ntp
ntpdate 0.cn.pool.ntp.org
hwclock --systohc
cat << EOF >> /etc/ntp.conf
driftfile /var/lib/ntp/drift
server 0.cn.pool.ntp.org
server 1.cn.pool.ntp.org
server 2.cn.pool.ntp.org
server 3.cn.pool.ntp.org
EOF

systemctl enable --now ntpd
ntpq -p
系统参数调整
cat <<EOF > /etc/sysctl.d/k8s.conf
# https://github.com/moby/moby/issues/31208
# ipvsadm -l --timout
# 修复ipvs模式下长连接timeout问题 小于900即可
net.ipv4.tcp_keepalive_time = 600
net.ipv4.tcp_keepalive_intvl = 30
net.ipv4.tcp_keepalive_probes = 10
net.ipv6.conf.all.disable_ipv6 = 1
net.ipv6.conf.default.disable_ipv6 = 1
net.ipv6.conf.lo.disable_ipv6 = 1
net.ipv4.neigh.default.gc_stale_time = 120
net.ipv4.conf.all.rp_filter = 0
net.ipv4.conf.default.rp_filter = 0
net.ipv4.conf.default.arp_announce = 2
net.ipv4.conf.lo.arp_announce = 2
net.ipv4.conf.all.arp_announce = 2
net.ipv4.ip_forward = 1
net.ipv4.tcp_max_tw_buckets = 5000
net.ipv4.tcp_syncookies = 1
net.ipv4.tcp_max_syn_backlog = 1024
net.ipv4.tcp_synack_retries = 2
# 要求iptables不对bridge的数据进行处理
net.bridge.bridge-nf-call-ip6tables = 1
net.bridge.bridge-nf-call-iptables = 1
net.bridge.bridge-nf-call-arptables = 1
net.netfilter.nf_conntrack_max = 2310720
fs.inotify.max_user_watches=89100
fs.may_detach_mounts = 1
fs.file-max = 52706963
fs.nr_open = 52706963
vm.swappiness = 0
vm.overcommit_memory=1
vm.panic_on_oom=0
EOF

sysctl --system
如果遇到
sysctl: cannot stat /proc/sys/net/bridge/bridge-nf-call-ip6tables: No such file or directory
是因为没有加载ipv6模块,可以使用 modprobe br_netfilter
设置节点主机名解析
cat << EOF >> /etc/hosts
192.168.77.130 k8s-m1
192.168.77.131 k8s-m2
192.168.77.132 k8s-m3
192.168.77.133 k8s-n1
192.168.77.134 k8s-n2
EOF
启用ipvs
yum install ipvsadm ipset sysstat conntrack libseccomp -y
开机自启动加载ipvs内核
:> /etc/modules-load.d/ipvs.conf
module=(
ip_vs
ip_vs_rr
ip_vs_wrr
ip_vs_sh
nf_conntrack
br_netfilter
)
for kernel_module in ${module[@]};do
    /sbin/modinfo -F filename $kernel_module |& grep -qv ERROR && echo $kernel_module >> /etc/modules-load.d/ipvs.conf || :
done
systemctl enable --now systemd-modules-load.service
安装docker-ce
curl -o /etc/yum.repos.d/docker-ce.repo https://mirrors.ustc.edu.cn/docker-ce/linux/centos/docker-ce.repo
sed -i 's#download.docker.com#mirrors.ustc.edu.cn/docker-ce#g' /etc/yum.repos.d/docker-ce.repo
yum -y install docker-ce bash-completion
cp /usr/share/bash-completion/completions/docker /etc/bash_completion.d/
mkdir  /etc/docker
cat >> /etc/docker/daemon.json <<EOF
{
    "log-driver": "json-file",
    "log-opts": {
        "max-size": "100m",
        "max-file": "3"
    },
    "live-restore": true,
    "max-concurrent-downloads": 10,
    "max-concurrent-uploads": 10,
    "storage-driver": "overlay2",
    "storage-opts": [
        "overlay2.override_kernel_check=true"
    ],
    "exec-opts": ["native.cgroupdriver=systemd"],
    "registry-mirrors": [
        "https://docker.mirrors.ustc.edu.cn/"
    ]
}
EOF

systemctl enable --now docker
可以用官网提供的docker环境检查脚本来检查系统内核和模块是否适合运行docker
curl https://raw.githubusercontent.com/docker/docker/master/contrib/check-config.sh > check-config.sh
bash ./check-config.sh
升级内核
可选, Centos 7 符合docker要求的最低内核版本
rpm --import https://www.elrepo.org/RPM-GPG-KEY-elrepo.org
rpm -Uvh http://www.elrepo.org/elrepo-release-7.0-3.el7.elrepo.noarch.rpm
yum --disablerepo="*" --enablerepo="elrepo-kernel" list available  --showduplicates | grep -Po '^kernel-ml.x86_64\s+\K\S+(?=.el7)'
yum --disablerepo="*" --enablerepo=elrepo-kernel install -y kernel-ml{,-devel}
grub2-set-default  0 && grub2-mkconfig -o /etc/grub2.cfg
grubby --default-kernel
grubby --args="user_namespace.enable=1" --update-kernel="$(grubby --default-kernel)"
免密登录其他节点
在ks8-m1操作
yum install sshpass -y
ssh-keygen -t rsa -P '' -f /root/.ssh/id_rsa
for NODE in k8s-m1 k8s-m2 k8s-m3 k8s-n1 k8s-n2; do
  echo "--- $NODE ---"
  sshpass -p 123456 ssh-copy-id -o "StrictHostKeyChecking no" -i /root/.ssh/id_rsa.pub ${NODE}
  ssh ${NODE} "hostnamectl set-hostname ${NODE}"
done
其中
123456是服务器的密码
部署k8s master节点
在所有的k8s-master节点上安装kubeadm
cat <<EOF > /etc/yum.repos.d/kubernetes.repo
[kubernetes]
name=Kubernetes
baseurl=https://mirrors.aliyun.com/kubernetes/yum/repos/kubernetes-el7-x86_64/
enabled=1
gpgcheck=1
repo_gpgcheck=1
gpgkey=https://mirrors.aliyun.com/kubernetes/yum/doc/yum-key.gpg https://mirrors.aliyun.com/kubernetes/yum/doc/rpm-package-key.gpg
EOF

export KUBE_VERSION="1.15.4"
yum install -y kubeadm-$KUBE_VERSION kubelet-$KUBE_VERSION kubectl-$KUBE_VERSION --disableexcludes=kubernetes
systemctl enable kubelet.service
下面的操作在k8s-m1节点上进行
建立kubeadm-config.yaml
cat <<EOF > kubeadm-config.yaml
apiVersion: kubeadm.k8s.io/v1beta2
kind: ClusterConfiguration
kubernetesVersion: $KUBE_VERSION
controlPlaneEndpoint: "apiserver.k8s.local:6443"
networking:
  podSubnet: "10.244.0.0/16"
imageRepository: "gcr.azk8s.cn/google_containers"

---
apiVersion: kubeproxy.config.k8s.io/v1alpha1
kind: KubeProxyConfiguration
mode: ipvs
EOF
controlPlaneEndpoint 是api server的地址
host绑定
echo '127.0.0.1 apiserver.k8s.local' >> /etc/hosts
使用kubeadm初始化control plane
kubeadm init --config=kubeadm-config.yaml --upload-certs

…
Your Kubernetes control-plane has initialized successfully!
To start using your cluster, you need to run the following as a regular user:

  mkdir -p $HOME/.kube
  sudo cp -i /etc/kubernetes/admin.conf $HOME/.kube/config
  sudo chown $(id -u):$(id -g) $HOME/.kube/config

You should now deploy a pod network to the cluster.
Run "kubectl apply -f [podnetwork].yaml" with one of the options listed at:
  https://kubernetes.io/docs/concepts/cluster-administration/addons/

You can now join any number of the control-plane node running the following command on each as root:

  kubeadm join apiserver.k8s.local:6443 --token s5t33i.ymmaq0x0i58bmxtt \
  --discovery-token-ca-cert-hash sha256:e15f276b0ca26e56334fb251afb3540bcf1eb7ca649e9b957702c776a9b7012a \
  --control-plane --certificate-key e1026305fa4c9436f7d97a403463f9546eb72052e3a533f357591d18f0df72aa


Please note that the certificate-key gives access to cluster sensitive data, keep it secret!
As a safeguard, uploaded-certs will be deleted in two hours; If necessary, you can use
"kubeadm init phase upload-certs --upload-certs" to reload certs afterward.

Then you can join any number of worker nodes by running the following on each as root:

kubeadm join apiserver.k8s.local:6443 --token s5t33i.ymmaq0x0i58bmxtt \
-discovery-token-ca-cert-hash sha256:e15f276b0ca26e56334fb251afb3540bcf1eb7ca649e9b957702c776a9b7012a
记录下join信息,后面node节点加入时使用。
使用netstat -ntlp查看服务是否正常启动
netstat -ntlp

Active Internet connections (only servers)
Proto Recv-Q Send-Q Local Address           Foreign Address         State       PID/Program name
tcp        0      0 127.0.0.1:38757         0.0.0.0:*               LISTEN      7476/kubelet
tcp        0      0 127.0.0.1:10248         0.0.0.0:*               LISTEN      7476/kubelet
tcp        0      0 127.0.0.1:10249         0.0.0.0:*               LISTEN      8698/kube-proxy
tcp        0      0 192.168.77.130:2379     0.0.0.0:*               LISTEN      8091/etcd
tcp        0      0 127.0.0.1:2379          0.0.0.0:*               LISTEN      8091/etcd
tcp        0      0 192.168.77.130:2380     0.0.0.0:*               LISTEN      8091/etcd
tcp        0      0 127.0.0.1:10257         0.0.0.0:*               LISTEN      8211/kube-controlle
tcp        0      0 127.0.0.1:10259         0.0.0.0:*               LISTEN      8188/kube-scheduler
设置kubeconfig
mkdir -p $HOME/.kube
cp -rp /etc/kubernetes/admin.conf $HOME/.kube/config
chown $(id -u):$(id -g) $HOME/.kube/config
通过kubectl检查kubernetes运行情况
kubectl get no
NAME     STATUS     ROLES    AGE     VERSION
k8s-m1   NotReady   master   3m32s   v1.15.4

kubectl get cs
NAME                 STATUS    MESSAGE             ERROR
scheduler            Healthy   ok
controller-manager   Healthy   ok
etcd-0               Healthy   {"health":"true"}
部署 Calico CNI plugin
wget https://docs.projectcalico.org/v3.8/manifests/calico.yaml
sed -i 's/192.168.0.0\/16/10.244.0.0\/16/g' calico.yaml
kubectl apply -f calico.yaml


kubectl -n kube-system get po
NAME                                       READY   STATUS    RESTARTS   AGE
calico-kube-controllers-65b8787765-b5j4c   1/1     Running   0          3m9s
calico-node-stfjt                          1/1     Running   0          3m9s
coredns-cf8fb6d7f-2p7ds                    1/1     Running   0          7m9s
coredns-cf8fb6d7f-47dfp                    1/1     Running   0          7m9s
etcd-k8s-m1                                1/1     Running   0          6m8s
kube-apiserver-k8s-m1                      1/1     Running   0          6m15s
kube-controller-manager-k8s-m1             1/1     Running   0          6m1s
kube-proxy-qbw88                           1/1     Running   0          7m10s
kube-scheduler-k8s-m1                      1/1     Running   0          6m6s
在其他k8s-mater节点上执行
将其他两个master节点加入进集群
# api域名先指向k8s-m1
echo '192.168.77.130 apiserver.k8s.local' >> /etc/hosts

kubeadm join apiserver.k8s.local:6443 --token lyr4x2.fwqoks6ex23v8kb0 \
  --discovery-token-ca-cert-hash sha256:07c1a6da2070c565291daff6bef8d34eb81ff998f448d6c9ec9b3ce2ae48570e \
  --control-plane --certificate-key f3f9951cc935ee56d226b6968a082aad30087d529589fd3de56f8ae3b4a9c42d

mkdir -p $HOME/.kube
cp -rp /etc/kubernetes/admin.conf $HOME/.kube/config
chown $(id -u):$(id -g) $HOME/.kube/config

# 将api域名指向本地
sed -i 's#192.168.77.130 apiserver.k8s.local#127.0.0.1 apiserver.k8s.local#g' /etc/hosts
部署k8s node节点
安装kubeadm和kubelet
cat <<EOF > /etc/yum.repos.d/kubernetes.repo
[kubernetes]
name=Kubernetes
baseurl=https://mirrors.aliyun.com/kubernetes/yum/repos/kubernetes-el7-x86_64/
enabled=1
gpgcheck=1
repo_gpgcheck=1
gpgkey=https://mirrors.aliyun.com/kubernetes/yum/doc/yum-key.gpg https://mirrors.aliyun.com/kubernetes/yum/doc/rpm-package-key.gpg
EOF

export KUBE_VERSION="1.15.4"
yum install -y kubelet-$KUBE_VERSION kubeadm-$KUBE_VERSION --disableexcludes=kubernetes
systemctl enable kubelet.service
配置haproxy
使用haproxy来提供 Kubernetes API Server 的负载均衡
yum -y install haproxy

cat <<EOF > /etc/haproxy/haproxy.cfg
global
  log 127.0.0.1 local0
  log 127.0.0.1 local1 notice
  tune.ssl.default-dh-param 2048

defaults
  log global
  mode http
  option dontlognull
  timeout connect 5000ms
  timeout client 600000ms
  timeout server 600000ms

listen stats
  bind :9090
  mode http
  balance
  stats uri /haproxy_stats
  stats auth admin:admin123
  stats admin if TRUE

frontend kube-apiserver-https
   mode tcp
   bind :6443
   default_backend kube-apiserver-backend

backend kube-apiserver-backend
  mode tcp
  balance roundrobin
  stick-table type ip size 200k expire 30m
  stick on src
  server apiserver1 192.168.77.130:6443 check
  server apiserver2 192.168.77.131:6443 check
  server apiserver3 192.168.77.132:6443 check
EOF
启动haproxy
systemctl start haproxy
systemctl enable haproxy
加入集群
echo '127.0.0.1 apiserver.k8s.local' >> /etc/hosts
kubeadm join apiserver.k8s.local:6443 --token lyr4x2.fwqoks6ex23v8kb0 \
  --discovery-token-ca-cert-hash sha256:07c1a6da2070c565291daff6bef8d34eb81ff998f448d6c9ec9b3ce2ae48570e \
 --certificate-key f3f9951cc935ee56d226b6968a082aad30087d529589fd3de56f8ae3b4a9c42d
测试集群
kubectl get no
NAME     STATUS   ROLES    AGE    VERSION
k8s-m1   Ready    master   31m    v1.15.4
k8s-m2   Ready    master   23m    v1.15.4
k8s-m3   Ready    <none>   26m    v1.15.4
k8s-n1   Ready    <none>   3m1s   v1.15.4
k8s-n2   Ready    <none>   2m8s   v1.15.4
部署nginx
kubectl run nginx --image nginx:alpine --restart=Never --port 80
kubectl expose pod nginx --port 80 --type NodePort
kubectl get po,svc
NAME        READY   STATUS    RESTARTS   AGE
pod/nginx   1/1     Running   0          1m

NAME                 TYPE        CLUSTER-IP       EXTERNAL-IP   PORT(S)        AGE
service/kubernetes   ClusterIP   10.96.0.1        <none>        443/TCP        15m
service/nginx        NodePort    10.101.142.114   <none>        80:30559/TCP   1m

curl 192.168.77.130:30559
<!DOCTYPE html>
<html>
<head>
<title>Welcome to nginx!</title>
<style>
   body {
       width: 35em;
      margin: 0 auto;
       font-family: Tahoma, Verdana, Arial, sans-serif;
   }
</style>
</head>

<body>
<h1>Welcome to nginx!</h1>
<p>If you see this page, the nginx web server is successfully installed and working. Further configuration is required.</p>
<p>For online documentation and support please refer to
<ahref="http://nginx.org/">nginx.org</a>.<br/>
Commercial support is available at
<a href="http://nginx.com/">nginx.com</a>.</p>
<p><em>Thank you for using nginx.</em></p>
</body>
</html>
安装有问题的时候,可以使用下列命令重置集群
kubeadm reset
iptables -F && iptables -t nat -F && iptables -t mangle -F && iptables -X
ipvsadm --clear
systemctl stop kubelet
docker rm -f -v $(docker ps -q)
find /var/lib/kubelet | xargs -n 1 findmnt -n -t tmpfs -o TARGET -T | uniq | xargs -r umount -v
rm -r -f /etc/kubernetes /var/lib/kubelet /var/lib/etcd ~/.kube/config